Monday, August 10, 2015

All good things must come to an end

All good things must come to an end.  Our awesome Facebook group Graphics for all Lovers of Disney is closed.  We got together and decided that with our busy schedules, there is not much time to continue running the group.  I had a great time making new things and seeing the wonderful pictures of the completed creations.  

My Photobucket still has many graphics that can be used to craft with.  Please remember that they are free and should never be used to sell anywhere in any format.  Please don't add any of my images to your free clip-art sites or offer them as your own creations to personalize for anyone.   

I will add new graphics periodically and upload the graphics from the Facebook group to my Photobucket account as time allows.  Thank you for sharing in the enjoyment that I have in creating new things.  I may not be super great at it, but I really love doing it!


Sunday, January 11, 2015

Making Magnets for your Stateroom door

Adding an extra touch of magic to your Disney Cruise can be as simple as making magnets to decorate your stateroom door.  I have previously given tutorials on how to create and personalize your own graphics, but I never really detailed how to make actual magnets.  
Please follow Disney Cruise Line rules and don't use any kind of adhesive on the doors.  If you use anything other than magnets you will be fined.  Stateroom doors are metal, so magnets will stick to all doors except concierge which I believe are wood.  
The first thing you need to do is collect designs that you would like to make magnets with.  You can find many FREE designs by doing a Google search to find sites with awesome DISigners willing to help you create designs and even help you personalize them.  If you would like some of my designs to work with you can find me on the Facebook page Graphics for all Lovers of Disney.  Many other awesome DISigners are also there ready to help.  Please be respectful of the rules and please do not use the designs for anything other than personal use.  


Here are two design samples of what you can find on the Facebook page linked above.


Once you find your images and have them personalized you are ready to print.  There are a few ways that you can turn your images into magnets.  
~ Printable magnet paper can be printed at home. This is probably the most expensive option as magnet paper and ink are not cheap.  Also, according to many cruisers the magnet pages are not that strong and do not stay on some of the doors as well.  You can purchase magnet paper at Michael's, Hobby Lobby, Wal-Mart and any office store. 
~ You can print onto photo paper or card stock, laminate and then add magnets to the back.  You don't have to laminate, but it does add a layer of protection and thickness to the paper for a sturdier magnet.  Magnets with adhesive backing can be found pretty easily at office, craft and big box stores. Dollar stores can also be a good place to find many handy craft items.  You can even use those little magnets you get as advertisements to glue to the back of your image.
~ Often times cruisers have the images printed for them and then they just add magnets to the back.  If you feel like splurging a bit, Vistaprint will print magnets for you.
Please remember that it is all in fun and:
Don't put any magnets out that you are not willing to lose. 

If you have any tips or questions please leave a comment below. 

Wednesday, May 8, 2013

Out of the Office

I have to start off with apologizing to anyone who has tried to get in touch with me lately.  As much as I would love to be able to answer all of my emails, I cannot at this time.  I have been able to answer a few emails once in a while, but It has been a madhouse around here with school, work and everything else that decides to throw itself at me.  I am keeping my Photobucket open to those who would like to use my blanks. There is a password and if you know where to find it you will have access to my files.  I would appreciate that if you use any of the images, you use them for your own personal use.  I hope that everyone has a magical year!

Thursday, November 15, 2012

Making your own Mickey Head

Wow, it has been a long time since I posted something new.  I have been quite busy and the time is going by so quickly.  It is a good thing really because my Husband is on deployment and I'm looking forward to his homecoming.  Enough about me...  Today I am going to teach you how to make your own filled Mickey Head in Word.

First thing you need to do is download this Mickey Head template and save it to your image folder.  I saved it as a .png file which will make it easy for you to use in the program of your choice.  In this tutorial I will be using Microsoft Word as the example.  UPDATE: I added a new file with black ears for those who want to just fill the face part of the Mickey.
To open the Mickey Head select - Insert, then Picture.  This will open a window.  Find and select the picture of the Mickey Head from your files to open.


Right click the image and select from the menu - Wrap Text - Behind Text.  This will allow you to move the image freely and sets us up for the next step.  Choose your orientation (portrait or landscape) and re-size your image to your preference.  I'm using a photo from a previous tutorial, but it's the same method.  Drag the corner to re-size and use the little knob at the top to rotate.


When you have the image where you want it it's time to insert the picture that you want to put inside of the Mickey Head.  So, as before, Insert - Picture, select the image you are using.  It will open up on top of the Mickey Head.  Right click the new image - Wrap text - in front of text.  This allows you to move and re-size the image freely.  Center the image so that it covers the Mickey Head.  You need to visualize about where the middle of the head is so that you can center your image.  Right click the image once it is where you want it, and select Send to Back.  This will put the image behind the head.  (These selections are also at the top of the page under Picture Tools - Format).


And that's it!  You should have your own personal Mickey Head.  Unfortunately you can't save your new Mickey Head as an image using Word, but you can print it, so it works great if that's all you need it for. If you were hoping to save as a picture file, you can follow the same steps here using Microsoft Publisher or Power Point and save as an image.  You can also use the template with Gimpshop, Paint, Photoshop or other programs to create your own one of a kind Mickey Head.    


Thanks for stopping by!  :)


Friday, August 24, 2012

Free Photo Editing Programs to get you started

I have been asked many times what program I use.  Right now I mainly use PhotoImpact Pro to edit my designs, but I recently received Photoshop as a gift from an amazing person, so I have been playing around with that when I can.  For those of you who do not want to splurge quite yet on a program, or just want to do a few designs on thier own, here are a few free programs that you can download and use to edit your photos, or make new designs.

Gimpshop -  This program is said to be very similar to Photoshop and can do some great things with photos if you are willing to learn how.
http://gimpshop.com/

Gimp - Gimpshop and Gimp are pretty much the same.  The only noticible difference (to me) is the layout. 
http://www.gimp.org/

I downloaded inkscape a while ago and used it a few times.  It does take some getting used to, but it does so many things.  You can draw shapes, draw freehand, manipulate photos and more.  Many prefer Gimp, but this one is probably my favorite one of all the freebies available. 
http://inkscape.org/download/


Now, another question I get asked a lot is; Where do I find all of my clilp art?  Well, Google is a great way to find clip art galore.  When looking for clip art try to stay clear of designs already made or fan art.  Those are someone else's hard work and inspiration, so use your own when creating images.  There are many, many times that I just cannot find what I need.  This is when I make sure no one needs me at home, I get my coffee and I sit down for an hour of art time.  I draw  a lot of things, but mostly my Mickey heads from scratch.  You might notice that not all of my Mickey heads are the same.  Sometimes the ears are smaller or higher up than others.  If I add a hat or tiara, I'll tweak the ears to fit just right.  If an itinerary map doesn't fit, I'll make it fit and so on.  Of course I love a good challenge, but I can't do everything and I learn new things every day.  I am in no way a professional and don't even compare to some of the amazing artists out there, but I do enjoy my little hobby so much.   

Go ahead give it a try.  If you want to design for fun, just do it.  There is no limit to your imagination...


Sunday, June 24, 2012

Adding Text to a Picture in Microsoft Word

Here is a quick tutorial on how to add text to an image using Microsoft Word.  I’m sure there are other ways you can do this, but this is how I would do it if I didn’t have my program.  You might have to play around a bit to get the text to look how you want it to look, but it is pretty easy to do once you get the hang of it. 

Find the picture you want to use and save it full size to your picture library.  Open a blank word document.  Locate and go to the insert” tab on the top menu bar.  Click on the “picture” button and your pictures library will open up.  Find your saved picture and click on it.  It will open in your word document. 


Right click on the picture and scroll down to “wrap text” then select the “behind text” option.   You can also re-size your picture by dragging the corners or sides and rotate by using the little tool at the top.  


Once you have completed these steps it is time to add the text to your image. 

Find the “insert” tab once again and select either “text box” or “WordArt” to add your text. 

I selected WordArt for my example.  It will add a box that says “your text here” and take you to the “drawing tools/format” tab.   Replace “your text here” with your own text and then position the text box where you want it.


Once you have your text where you want it, change the font and size to your preference under the “home” tab.  I used the Waltograph v4.1 font.  You can download it for free at; http://mickeyavenue.com/fonts/disney-fonts-list/ 

Go back to the “drawing tools/format” tab to add the finishing touches.  I used “text fill” yellow, “glow” lt. blue.  Like I said before, play around with the different colors and styles to personalize it just the way you want it.  

Just an added note:  You cannot save the picture as a .jpeg in Word, but there is a simple way around that.  Make sure that your entire image is visible on the page (No cut off edges or lines).  Press the Alt + PrtScr buttons on your keyboard.  This will save your desktop screen.  Open up a program like paint and paste the image you just copied.  It will most likely have unwanted areas on your image.  Just use the crop tool to cut out what you don't want and save from there as a .jpeg.  If you use Microsoft publisher or PowerPoint, you can save as a picture file directly with no extra steps needed.      


Here is the finished product.  :)

If you like this tutorial and would like to see more, please let me know what you are interested in learning about and I will add it to my blog.  Thanks!

Thursday, May 17, 2012

Name Fills in Microsoft Word and Publisher

Ever wonder how to do a simple name fill in Microsoft Word?  Well, I get asked this question a lot, so I thought I would post a quick tutorial on how to do this for those who would like to try it on your own.  You can follow the same steps in Microsoft Publisher if you have it.  If you are using Word 2010 like myself, you will not be able to do this, but good news, you can use PowerPoint 2010!  There are a few differences using PowerPoint, so if you need help using it, please let me know. 

 
The first thing you should do is save the picture that you want to fill your word with.  Usually in your pictures folder.  I will use this picture. 


 Use a version of Microsoft Word with the WordArt option and open it up. 

- Go to insert
- WordArt


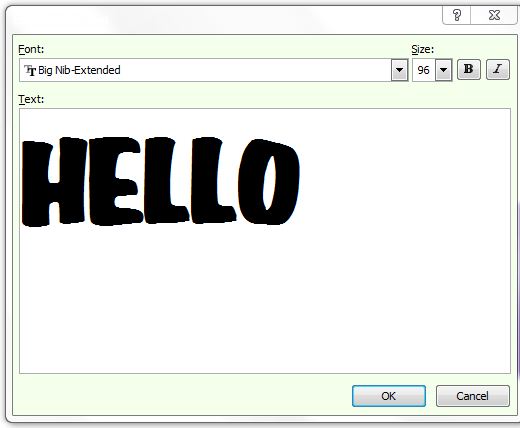
- Select the style you would like to use, type your word, choose the size you want the text to be, then click OK. 

- For text fills you want to use a bold font so that your picture will be easy to see.  I will use Big Nib-Extended, but I also like to use Boulder, Coaster and Impact.  Feel free to find your favorite.  (There are many sites where you can find a collection of free fonts to download.  I like Dafont.com.)

-You can re-size your text by dragging out the corners or sides of the text box. 


- Right click on your text and then click 'format WordArt'

- When the window pops up, under the 'fill' option, click 'fill effects' and another window will pop up. 


- Click the 'picture' tab and then the select picture button.  A window will pop-up where you can search for the image you would like to use.  Select your picture and click OK.
- As you can see, the color tab now has your picture.  Choose the color, line and weight of your text outline and then click OK. 


- Ta Da! Your text should now be filled with your image!


- If you are satisfied with how the image looks you can print it out or save it as an image by taking a screenshot of your text by pressing the PrtScr button on your keyboard.  Open up your paint program or any photo editing program you use.  Paste the picture and then crop it to get rid of the extra stuff you don't need and then save.  (If you are using Publisher you just need to right click the image and then select the 'save as picture' option.)


- If you want to add some pizzaz to your text, you can play around with it using the format tools. 


Here is my text using a 3D effect and the text transform tools. 


-  So, what are you waiting for?  Go ahead and try it.  Have fun experimenting and creating your own work of art!


Any questions?

~Milliepie